Latest Post!

Please find the newest post below.
Have a great day.
Don't forget to create, play and scribe!
Showing posts with label diary. Show all posts

Saturday, 4 February 2017

Happy Unexpected Crafting New Year! Aka The CHANEL Hassle. Part 2 of 2

Dear Scribblers

Sorry for the delay. I'm finally starting to feel better. So, here it is... What happens when you have a Louis Vuitton horizontal agenda insert that's too big for the medium agenda Chanel cover? For the backstory of why I was in this position, please read Part 1.

I needed to get this:

Into this:


It only stuck out about 1cm or so, but it looked a mess. I had a few choices open to me. The first was to pinch the metal coils, which were causing the majority of the problem.

I could have used pliers, but I had the fabulous Zutter Bind It All. I put the agenda in place, and gently clamped down, tightening the coils. It helped, but it still hung over! Holy Zutter, Batman! I would have to cut it down.

I looked at cutting a bit off the bottom, but it would have clipped into the days, plus I would have lost the gorgeous silver paper edging, which matched the Chanel CC logo on the front of my agenda so I didn't want to lose that from the longest edge.

I knew exactly what I needed to do, that was to take the whole thing apart and take off the top edge.

I began removing the old coils, and then making sure the silver edges of all the pages were aligned, I then used bull-dog clips to hold them altogether for the next part of the process.

I decided to use my metal ruler and sharp craft knife to cut through the whole thing a little bit at a time. I had a paper trimmer and variety of scissors on standby, in case this first idea didn't work. I needn't have worried as working methodically through the pile, it didn't take very long to get it cut.


I cut just below the original holes which made it a perfect guide for lining up the ruler. Any tiny wavers or slivers of paper left were easily dealt with using a nail file.


So now what? Now, I needed to make new holes to take the Bind It All coils (couldn't use the originals as the spacing didn't align.) I decided I didn't want to completely bind it with wires across the top, therefore I didn't need to punch holes all the way. I settled on 4 each end, but how to make sure I spaced them identically either side and all the way through the pile! I hadn't used the Zutter for a while, so it took a little figuring out. In fact, I found this the most difficult part of the whole process.
Here's what I came up with. (If you have a better/simpler/quicker way, please let me know in the comments, as I'm always up for new tricks and tips.)

First, I took a scrap piece of card and punched out holes all the way across to make a guide.


I then put the card back into the Zutter, hooking a hole into the stop bar tab, so it held the card steady and in place, and counted 4 spaces in from the left (as you look down on the machine.) I made a mark between the 4th and 5th holes. I removed the card again, and drew a line down the sheet, making sure it landed half way between the two. This I hoped would be the correct placement to the edge of the page.


Next came the test! I hooked the guide sheet back in place, and grabbed a piece of paper, lining it up against the guide line and punched out the holes...


And what did you know? It worked!


I tried a few more times with scrap, just to make sure that I was confident with the alignment, and also to make sure I had a steady hand. It was now down to me to get the pages to line up with the ruled line I'd drawn, as long as I did that, all probability meant that it would work.

To begin with, I punched with just 4 or 5 pages at a time. I'd cut out the one side first, before flipping the sheets over to punch the other 4 holes, so that selection was complete. Then I moved onto the next few pages, and over, and over again. As I grew in confidence, I began adding a few extra sheets to the pile, which I finished in no time at all. Here it was at about the half way point.


Next on the agenda... for the agenda!.. was to bind it all back up again.


Problem was I only had fairly large coils, or 'O Wires' as Zutter call it, but I thought I'd give it a go.


I cut the wires down to 4 loops each side, hooked them onto the pages and using the other part of the Bind It All, gently squeezed them into position.


Well. It looked the part, but - but, it still wasn't quite right! After all that, it didn't sit snug enough inside the cover. So disappointed. I knew it was all down to the ring size. They were far too large, plus I noticed they were pressing into the leather inside the cover. No good at all. Then I thought of a great interim idea. Cable ties!

My hubby is a superb handyman with a well stocked tool case. 😜😆😂 He has cable ties (or tie wraps, depending where you come from) of all different sizes and colours. So I knabbed a few different ones to experiment with, and settled on using just 4 of these in the end.


Any more than 2 either end was overkill, and I found that the more you add the more the movement of turning the pages are reduced, and I think they'd be more chance of ripping the paper that way. Trying only 1 cable tie each end made the agenda unstable.

As I said, these were/are only meant to be a stop gap before deciding on whether I'm going to change over smaller wires. However, after using the agenda for about 3 weeks I can say, I'm enjoying using it like this.


In fact, I don't notice the binding, and isn't that the best way? I'd notice it, if it wasn't working, if it was causing problems or I was fighting with it to turn the pages, but honestly I'm not.

It's probably not as perfect as using proper coils, but I don't think they are any less 'pretty', as the original metal wires can't be considered to look that attractive either.

What I'm doing is using the agenda, and generally enjoying using it. Has it been worth the hassle? Well, I would have preferred to have walked - or what did I originally say, 'entered with a skip in my step' - into Chanel and bought the correct insert, which would have saved me a lot of time and effort. However, seeing as I've ended up with an attractive Louis Vuitton weekly planner in the same horizontal layout that now works and fits inside the Chanel medium agenda cover, so yes, I'd say that it was worth the hassle.

Has it all gone to plan? No! 🙀
Am I now pleased with the outcome? A resounding yes! 😃👍
Would I buy another Louis Vuitton agenda? Now, there's a question!!!
If you'd like an answer to that, please leave a comment here, or on the corresponding Instagram picture. I'll follow up with a new post of a full review on the insert, including pen tests, along with further photos of how I'm making it work.

Happy Scribing!

Important Notes
1. Please note that I am not connected to any companies mentioned in this post. I do not receive any products, funding or gifting from these businesses. All products shown have been bought by me, or gifts from family or friends. I mention the items because I like them or have my own private opinion about them. It's just little old me talking about ma stuff! ;-)
2. If you would like to see more of anything in this series, please write a comment below, or 'like' and leave a comment by my latest Instagram photo, letting me know what you would like me to post photos and write about.
3. If you like what you read, don't forget to bookmark this site, and please share it with your friends.
4. You can also follow me on Twitter and Instagram - @TheCraftyScribe which I update regularly with all things crafty, scribbling, beauty, fashion, the cats, sci-fi, fantasy, and the ephemera of 42*...................
*42 = Life, The Universe and Everything!

Friday, 21 October 2016

Lulu Guinness Stationery Review - Part Two!

Dear Scribblers

After yesterday's review of the Lulu Guinness Custom A5 notebook and the Lulu Icons Set of 3 A6 notebooks, the review continues...

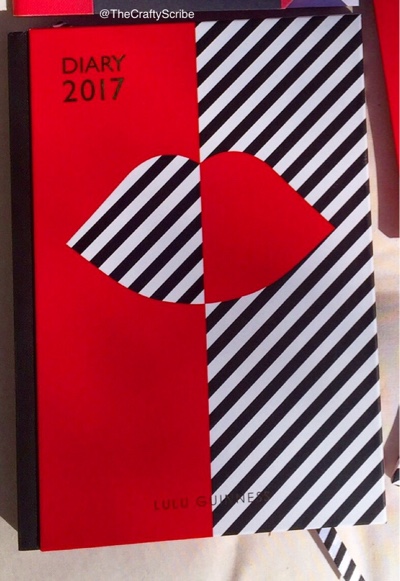
50:50 Lip Diary for 2017 💋
Here's the review that most planner addicts have been waiting for, which you'll find is my most disappointing of all 3 items, but it's not all bad!
I love the design and A5 size. The cover is made of a study hard card with gold foil lettering and recessed black cloth blinding - allowing it to lay fairly flat. The pages are stitched in sections and glued.
There's a stripy silky ribbon bookmark, triangle card inside slip-pocket in the back cover, and 6 top-loading card pockets which are all useful. Although, I wish the top-loading files were spread out a bit more evenly throughout the book than they are. They appear at 3 weeks into the year, then one at a further 8 weeks, then we wait for another 16 weeks! Followed by 8 weeks, 16 weeks then the last one appears in the address book section 8 pages later. Obviously, there's a pattern here to the layout, which must be to do with how they are glued in, but it doesn't make a lot of practical sense. 2 have the multiple red lip design on one side and plain black on the other, and 4 are black and white stripes with plain red on the other side.

The main bulk of the diary is taken up with the layout of a week a page with notes opposite. This has always been one of my favourite styles to work with.
The diary begins with the usual personal information page, followed by a spread of blank red pages declaring the following page is 2017 Year at a Glance, and low and behold, it is! Next, there's the multi red lip design over two pages, stating that the next set of pages are a Month at a Glance... and you guessed it, they were right! I think you may be getting the idea that I think there's a lot of wasted space. I'm sure I can think of ways of using all this superfluous real estate.
I must say, I do really enjoy how they have drawn the monthly layouts. Each month is on a single page, but you turn the book to landscape to use it, and you don't lose out on writing space, so much easier to use than the month across 2 pages.
This is followed by stripy pages separating the month from the main Week at a Glance. I love that all the days have the same amount of space, unlike some diaries that squash poor old Saturday and Sunday. All the main UK holidays are listed, along with the dates of the main international fashion weeks. A chic touch! As is the little red lips at the bottom of each notes page.

An address section (12 pages - a few too many for my liking) is next. Followed by notes and doodles - which has plain lightly patterned pages, sections entitled "museums, galleries & exhibitions", "films & books", 4 sides of numbered to-lists, 2 for shopping lists and 27 sides of lined note pages.
 Both of these have the ubiquitous patterned double page separator. It ends with a page of international dialling codes, and page listing international holidays for 13 'major' countries.
Unfortunately, it loses points for a couple of reasons - the last two pages, on my copy, were stuck together and ripped. A little disappointing, but I can overlook it.

The main reason I feel disheartened is due to the poor quality of the paper. It feels rough, yet thin, which lets the 'designer' style down.

 It's so different from the notebooks reviewed yesterday. This paper is a world away in look, touch and how the pen feels when writing.
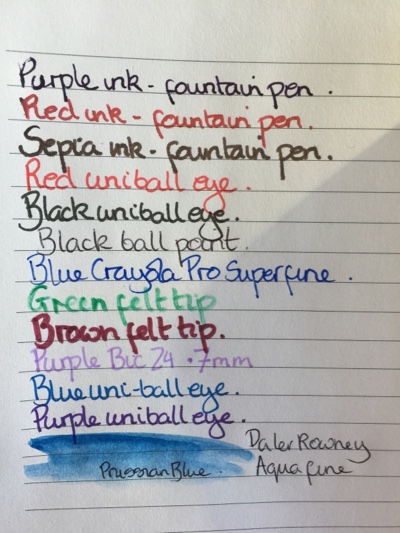
I also wanted show you a pen test, and you can see what it's like for yourself.

I'm not going to be able to use my fountain pens in it at all, and even though the other pens do not necessarily seep through, the depth of indentation of my writing is quite astounding! I know I'm not the lightest writer, but my hand isn't that heavy. I also gave it a quick wash of watercolour, the paper pilled immediately, but I knew that was a tough task. I think I'd only trust ball point pens, and pencils on this paper.
I know now that I couldn't use this as my main diary, as the limitations of pens would drive me insane. I love writing with my fountain pen, so I know I couldn't put up with that. However, it won't go to waste, as I'll be using it as my social media planner for the new year, along with my multi-coloured ball point pen!
If you love the Lulu Guinness aesthetic and her colours, this is a must... as long as you can look past the paper quality. There's much more going for it than not.

Happy Scribing!


Price & Codes
50:50 Lip Diary 2017
Style: 50125135
ISBN 978-1-84949-861-6
Lulu Guinness website - £18:00
Amazon UK - £13:06

Made by Quadrille (Hardie Grant) for Lulu Guinness - www.quadrille.co.uk - www.quadrille.com
Prices shown as listed on www.luluguinness.com and Amazon Prime UK - 19 October 2016. For all these items, a quick search on the net brings up alternative stockists, too
Also in the range - A5 luxury notebook, and notecard set.
Important Notes
1. Please note that I am not connected to any companies mentioned in this post. I do not receive any products, funding or gifting from these businesses. All products shown have been bought by me, or gifts from family or friends. I mention the items because I like them or have my own private opinion about them. It's just little old me talking about ma stuff! ;-)
2. If you would like to see more of anything in this series, please write a comment below, or 'like' and leave a comment by my latest Instagram photo, letting me know what you would like me to post photos and write about.
3. If you like what you read, don't forget to bookmark this site, and please share it with your friends.
4. You can also follow me on Twitter and Instagram - @TheCraftyScribe which I update regularly with all things crafty, scribbling, beauty, fashion, the cats, sci-fi, fantasy, and the ephemera of 42*...................
*42 = Life, The Universe and Everything
!

Thursday, 20 October 2016

Lulu Guinness Stationery Review - made to be stopped and stared at!

Dear Scribblers


Have you seen the gorgeous new Lulu Guinness stationery? As an owner of a few pieces of her stunning handbags and accessories line, I was so pleased to hear the fabulous British designer was bringing out a stationery range, too. So as soon as I could, I hopped on-line, and bought 3 out of the launched 5 items. I picked mine up mid-August from Amazon UK, which was quite a chunk cheaper than her website. See pricing and full product details at the end of this post.
Here are all three of the covers:
Top left: notebook with 2 sticker sheets.
Bottom left: 2017 diary - a week a page with notes.
On the left are 3 mini notebooks with box.

And an overview of the paper in them all:
Top 2 show the 2017 diary layout and close-up of one of the top-loading envelopes.
Bottom left - notebook showing tabs and stickers.
Bottom right - 3 small books w/ different style paper

They couldn't be more perfect for me, my favourite colours: red, black and white, with some of my most chosen design elements: stripes and lips, with a little bit of a cat illustration, all by one of my top 5 fav designers. (If you'd added diamond quilting and stars, and it would have been perfect. 😂)
A5 'Custom' Notebook 💋

The item I've used the most has been the A5 notebook. There are 2 notebooks this size in her range: a hard-backed one called 'Dare to Be Different', and this one called the 'Custom' notebook. It has an old-style 'school exercise book' cardboard cover. There's 30 doubled-sided sheets (60 pages) - lined at the front of the book and plain in the second half, all tabbed into 8 sections printed with her signature lip, hand and eye logos. The 'custom' part probably refers to the 2 sheets of stickers, at the centre of the notebook, of 2 of each of the designs above along with 2 cats faces and 2 'Lulu Guinness London' logos.

The paper is high quality, almost card quality, (don't ask me about gsm as these are lost on me, although as a stationery addict, it's something I should definitely learn about!)
It's a dream to write on, even taking fountain pen and light watercolour washes. Please note that the book is stapled together and doesn't naturally lie flat, it can stand some manipulation.
We had a number of home renovations in recent months, which a list of jobs still to be completed, and this has been my house workbook to keep a track of it all. The front lined section for to-do lists and contact details with a separate tabbed area relating to a separate area of the house. Even though there's logos on the tabs, there's still plenty of space to write your own heading. The back plain pages are used for calendar layouts (so I can track on-going projects), sketches of floor plans and mini-mood boards of items torn from magazines, brochures and paint swatches. (If you'd like a separate post of the used pages, please leave a comments.)
There's plenty of Lulu design elements - I especially like the lip book plate on the cover for writing in the project. I can imagine a very stylish teen or college student with 3 or 4 of these containing their important revision notes. I also like the faux turned back corner on the cover, showing the glimpse of the little red lip, along with the signature gold foil logo on the back cover.
My only wish is that the stickers were smaller, and that there were more of them. At around an approx of minimum of 3 cm to 6cm max (1 X 2in), they certainly pack a punch. Not your average planner sticker.
A delectable designed notebook for all your notes, to-dos and doodles.
Lulu Icons Set of 3 A6 Notebooks 💋
If pocket and handbag jotters are more your style, you'll love this set of 3 mini Notebooks which come a cute slide-in black box to, all with different design looks and papers. Each has 48 sheets - 96 sides.
The black and white stripe cat print has plain paper, with pale pink cover lining and the quote "Kooky Cat" on the inside front cover.
The multiple red lips and half black and white stripe cover carries the stripes inside and reads "A little lipstick never hurts." This comes with .7cm lined paper.
Finally, the half red/half black and white lips cover is lined in red with a quote of "Don't forget your lipstick" and is filled with .7cm square grid/graph pages.

Once again, the paper is high quality, but not as thick as the notebook above, which would actually be too much for books of this size.
I've been dabbling in these, but not used them as much as the notebook. I could see myself dropping these into a fauxdori/travelers notebook sort of cover and using the plain book for sketching/mini art journal, the lined one as a common place book or for jotting down storylines, poetry and blog ideas, and of course, the grid would make a great bullet journal. Although, the graph squares are quite large, so if you're anything like me, you might find yourself filling up the book pretty quickly!
If your intention was to use all three, it would make for a very chunky set to carry around with you. There's another reason why the 'fauxdori' route may not work, as the papers are stitched in groups and then these sections are glued into the spine, so there's no defined centre to the book. It's also a worry, as the book doesn't lie open, once you begin to manipulate it as you attempt to create an easy working surface, will these sections fall out? I hope that the binding glue is strong and holds them together. I'll let you know as I use them.
My aim is to use the grid book as my bullet to-do list, along with the diary - as their covers match! Then the other two as discussed above, but not to carry around together.
If you look at them, for what they are intended for, as little pocket notebooks, then they are fun to use, gorgeous to look at, and will certainly be a talking point when you bring it out of your bag.
I hope you've found these reviews interesting, as they ran a little longer than I expected, I've decided to split it, so there's not too much information coming at you. I hope that you'll return again tomorrow for the full review on the 50:50 2017 diary.
Please see all pricing and details listed below.

Happy Scribing!


Prices & codes
Custom A5 notebook
Style no: 50125173
ISBN 978-1-84949-863-0
Lulu Guinness website £8:00
Amazon UK £8:00
Lulu Icons A6 Set of 3 Notebooks
Style: 50125166
ISBN 978-1-84949-864-7
Lulu - £15:00
Amazon - £10:00

Made by Quadrille (Hardie Grant) for Lulu Guinness - www.quadrille.co.uk - www.quadrille.com
Prices shown as listed on www.luluguinness.com and Amazon Prime UK - 19 October 2016. For all these items, a quick search on the net brings up alternative stockists, too
Also in the range - A5 luxury notebook, and notecard set.

Important Notes
1. Please note that I am not connected to any companies mentioned in this post. I do not receive any products, funding or gifting from these businesses. All products shown have been bought by me, or gifts from family or friends. I mention the items because I like them or have my own private opinion about them. It's just little old me talking about ma stuff! ;-)
2. If you would like to see more of anything in this series, please write a comment below, or 'like' and leave a comment by my latest Instagram photo, letting me know what you would like me to post photos and write about.
3. If you like what you read, don't forget to bookmark this site, and please share it with your friends.
4. You can also follow me on Twitter and Instagram - @TheCraftyScribe which I update regularly with all things crafty, scribbling, beauty, fashion, the cats, sci-fi, fantasy, and the ephemera of 42*................... *42 = Life, The Universe and Everything!

Saturday, 25 April 2015

Personal Planner - The Diary with Multiple Personalities and Personalisation - plus discount code!

Dear Scribblers

If you've been following me on Instagram - @thecraftyscribe, you'll know that I've been using an A5 planner from Personal Planner. I've found this to be invaluable as my desk diary, as the pages are clean, crisp and of high quality. There's plenty of space, with the ability to use it in a way that works for you.

Personal Planner is an on-line company, which allows you to... well, do what their name implies! You can design a planner according to your own specifications from a wide range of options. There are four sizes to choose from, and you can decide exactly the month when you want it to start. Want it to run from June 2015 - May 2016? That's cool! How about September 2015 - August 2016? That's fine, too. More traditional, and you need your planner to do a full year of 2016? That's up to you. Any 12 month period can be chosen. Plus, they deliver worldwide!


1. This is an overview of my planner. Although Personal Planner offers a number of different cover colours and designs, I made my own, using favourite photos, in an Apple Mac app called Collage Factory, and then uploaded the images to Personal Planner. If it's just a single photo you want, you can upload it directly from your computer, or if you have an Instagram account, Personal Planner offer a function to import your favourite photos to create a collage directly on their website. It can't be simpler than that! (You can also choose the colour of elastic for the the closure.)

2. The planner offers the opportunity to add a yearly view over 4 pages - either a single year or two years, e.g: 2015 or 2016 or 2015/2016 or 2016/2017. Plus, an added bonus, you can add personal dates, such as: birthdays and anniversaries, which appear on both the yearly overview and the weekly planner pages.

3. There's a front page for your contact details, and any message you want to add. I included one of my favourite quotes taken from The Desiderata by Max Ehrmann.

4. Then there's the main pages. Personal Planner only offer a weekly view, but this is where the limitation ends! Everything can be personalised from the top colour bar, to the layout (column format, as shown here, and a number of box formats) which can be lined, unlined, shaded one of a number of colours, add an hours-at-work box, exercise workout info, or like me, the weather. Then there's three sections below the daily section, which can be selected as graph, musical score, to-dos, ideas, exams, lists, dinners...

5 and 6. After the calendar pages, you can decide how you want the rest of the planner to look. I have lined and graph papers, along with a contact/address list. Yes, you can input all of your personal contacts and important numbers, and the planner will come to you with it all printed in, and ready to use. If you have quite a few contacts you want added, it can take some time to type it all in, as the database is a little fiddly to use, but once you get the hang of it, it's fine. There's also blank pages, sheet music, sudoku, maps and even colouring pages available to choose from.

If you're a teacher, you'll love the options of the specially designed sections for preschool, primary and subject 1 to 4 classes.

screen shot from http://www.personal-planner.co.uk


You really do need to click onto the 'START HERE' button on the website, and play around with all the options available, to see the full extent of how you can personalise your planner. It's addictive! Oh, and did I mention that there's notebooks available too? ;)

I'm enjoying using my planner. I write everything in it from appointments, daily timetables and to-dos, ideas, record of Instagram uploads, quick reminder notes, and in the notebook section: quotes, long term goals, poems and story ideas. I occasionally play with 'pretty planning' decoration, with stickers and wash-tape, but most of the time. It's just full of my scribbles. The pages have been designed so well, that they are already lovely to look at to begin with.


Are you excited about designing your own planner with Personal Planner? Here's something to help you along the way. Personal Planner has been kind enough to offer a 15% discount code for you to use against your planner or notebook. Please go to http://www.personal-planner.co.uk and use the code: D-BMJQ-SQFJ to obtain your 15% discount. This offer expires on Sunday 3rd May 2015.


Happy Scribing! 

(In my next blog post, I'll show you how I turned my Personal Planner into the inserts for my A5 red Cuban Filofax organiser.)

Wednesday, 18 June 2014

Popular Pens for Particular Purpose - 2 of 4 My Smythson Pens

Dear Scribblers

Here's the follow up to my 'Notable Notebooks' series. Day two of four: Popular Pens for Particular Purpose (Plus Personal, Peculiar and Playful Picks) focusing on the pens I use, and the tasks they perform.


1. My Old Favourites and Regularly Used
2. My Smythson Pens
3. Hidden in my Pencil Case - the Expected and Digital Unexpected
4. Useful Others, Fond Memories, Colour and Beyond!

Onto my Smythson handbag wafer diary and notebook, I use matching Smythson pens with them both. The first is official called a 'lady's pen' as it fits into the dainty hand of a 'laydee', and also into any of her petite purses she may be carrying. An old-fashioned term which may make us laugh, or cringe, or roll our eyes now, but still an extremely useful pen. A tiny gold blue ball point with the diary, you pop the lid into the end which extends the length making it easier to hold, then when not in use, it clips into the spine of the diary keeping it safe. I've had both this and the next pen for over six years, I think.  


You can tell the silver pen is older and been given some use as it is quite scuffed now. I can't remember if it came with the leather jotter, I think it did. I've only recently pulled it out from my notebook pile where it's been sitting unused (but never unloved) for a while. It's going straight into my bag for easy access when I need to scribble down that idea, note or list. 


Unfortunately, Smythson no longer offer these pens in their online store. There is a similar shape to my silver pen available in a pencil, and in  a choice of silver or gold: http://www.smythson.com/silver-wafer-pencil.html

Please return tomorrow for Part 3, to discover what's hidden in my Pencil Case... the Expected and the Digital Unexpected!

Happy Scribing!

Important Notes

1. Please note that I am not connected to any company mentioned in this post. I do not receive any products, funding or gifting from these businesses. All products shown have been bought by me, or gifts from family or friends. I mention the items because I like them or have my own private opinion about them. It's just little old me talking about ma stuff! ;-)

2. If you would like to see more of anything in this series, please write a comment below, or 'like' and leave a comment by my 'Popular Pens' Instagram photo, letting me know what you would like me to post photos and write about. 

3. If you like what you read, don't forget to bookmark this site, and please share it with your friends. 

4. You can also follow me on Twitter and Instagram - @TheCraftyScribe which I update regularly with all things crafty, scribbling, beauty, fashion, the cats, sci-fi, fantasy, and the ephemera of 42*................... *42 = Life, The Universe and Everything!

Thursday, 15 May 2014

Notable Notebooks Part 2 of 5 - The Organiser... Filofax style (plus another plea to Smythson!)

Dear Scribblers

Welcome to my new short series 'Notable Notebooks' (Two of Five):


This five day series includes:
1: My Ultimate Quality Favourites 
2: The Organiser
3: My Newest Arrivals
4: When a Notebook isn't a Notebook
5: Used, Loved, Never to be Thrown away

Please read the important note at the bottom of the page. 

Onto my Filofax, it's a red chilli coloured Cuban, which is, as I said yesterday, A5 size. It was bought last October at an amazing discount from TK Maxx, with the full 2014 inserts pack! I've used Filofax and other similar organisers in the past, in both A5 and Personal sizes, and decided to try again with it this year, as I wanted to have everything in one place, including my to-do's, writing ideas and journalling.(This was why I wanted the blue Smythson pages, I planned to journal the whole of 2014 and then bind them together with homemade covers at the end of the year.) To be honest, it hasn't worked out this way. I'm still finding it difficult to find a file system which works for me, at the moment, and I keep changing my mind! It's coming together, but still not perfect. 


For the past 8 years, I've used Smythson diaries in their Soho, Premier or Bijou Portobello sizes (Smythson, can you also bring all three sizes back for 2015, please? ;-) Please?) So going back to such a large organiser has been strange, although I also have a small Smythson red wafer diary to carry in my handbag for this year, then at home, it slips conveniently into the little pocket inside the cover. 

(Please see note at the bottom.)

It's the best of both worlds... for now, who knows what I'd do next year. As I've also found out about this company which seems very enticing:
from YouTube's MsGoldgirl -  

The only thing that bothers me is - you guessed it - paper quality, it's difficult to tell without being able to touch it. If it was just a notebook to use for a short time, it would not be an issue (well, more of a grumble really, it's not 'end of the world' stuff. LOL! We just like things a certain way, don't we?) but this is a diary which will be your companion for a year or more, so we want it to feel nice and be the right texture to write on, which takes the ink well, without smudging or seeping. That perfect 'Goldilocks' page. If you are using one of their personal planners at the moment, I would love to hear what you think of it. 

Of course, these are musings for next year, for now I'm playing around with my Filofax, along with a little helper, which I'll tell you all about in a couple of days in part four of the series. I've got you wondering now, haven't I? 

Please come back tomorrow and see the next instalment of 'Notable Notebooks' - My Newest Arrivals. 

Happy Scribing!

Note from the Filofax Photo 
In case you are interested, the pen in the photo is a Ted Baker Stylus pen - with the touch screen tip on one end, and a ball point pen on the other. You can find them on-line at Amazon, John Lewis, Selfridges, eBay and many other places. 

Important Notes

1. Please note that I am not connected to any company mentioned in this post. I do not receive any products, funding or gifting from these businesses. All products shown have been bought by me, or gifts from family or friends. I mention the items because I like them or have my own private opinion about them. It's just little old me talking about ma stuff! ;-)

2. If you would like to see how I presently set up my Filofax, or anything else in this series, please write a comment below, or 'like' and leave a comment by my Notable Notebooks Instagram photo, letting me know what you would like me to post photos and write about. 

3. If you like what you read, don't forget to bookmark this site, and please share it with your friends. 

4. You can also follow me on Twitter and Instagram - @TheCraftyScribe which I update regularly with all things crafty, scribbling, beauty, fashion, the cats, sci-fi, fantasy, and the ephemera of 42*................... *42 = Life, The Universe and Everything!

Tuesday, 10 August 2010

The Crafty Scribe Communiqué - Think about your writing and Project of the Day

Communiqué - News Flash

Dear Scribblers

The other day, I wrote a poem entitled Pages of a Life and it made me think about all those things I write about in my journal. If someone in the future read it, what would they think of me?

My daily journal is part diary, part ideas notebook and part psychotherapy. It covers everything from what I've done during the day, to how I feel about my life, to lists of goals and to-dos, to snippets of inspiration and quotes.

If anything, I know that I don't want to appear as a depressive moaner, but I'm sure that there are some pages filled with angst. Sometimes I wonder if I've ever left my teenage years! I certainly don't want to appear dull, even though some days are just plain boring.

What I would love that future person, who got hold of my diaries, to think is that this person had a good time, ups and downs maybe, but that they tackled life with joy, enthusiasm and passion. There's only one way to achieve this:

Project of the Day - this is actually a Project for Life! Think of that person in 100 years holding your diary, they turn over this first page and begin to read it. How would you like your life to appear on those pages? Live it and record it. Live the life you want it to be, tackle each task with renewed positive vigour and live each day as a day that deserves to be written down in history.

Happy Scribing!

Communiqué Ends... Communiqué Ends...

Tuesday, 24 November 2009

Part Three - Harnessing Your Alternative Computer Programmes for use in Journalling and Scrapbooking.

Part Three - Harnessing Your Alternative Computer Programmes for use in Journalling and Scrapbooking.

Using Your Regular Word Processing Software in New Ways.

Dear Scribblers

Most computer users will have some sort of word processing software on their PC or Mac. Be it a bought package like: Microsoft Word or Apple iWorks - Pages, or using an open source programme such as: Open Office, AbiWord, or NeoOffice.

Have you thought about how you can use it for your journalling, or scrapbooking?

Of course, there is the obvious, using your programme as your diary. Open up a new document and off you type. If you do this, you can import pictures, even links, sound and video clips (if you are not going to print the pages out). However, think about how you will organise it. Will you set up a file named, for example: ‘2010’ and then have additional files inside with named for each month, and then start a new document for each day, or each week? Or inside your ‘2010’ file will you have documents named; ‘January’, ‘February’... etc, and write a whole month in one place? It depends on how much you are going to write. It’s important to be organised from the get-go.

That’s okay for a regular diary, but what about scrapbooking? What else can you do with your word processing programme?

Here’s a few ideas:

Make Your Own Word Art. Does your programme have the facility of fancy lettering? If you have Microsoft Word, you are way ahead with Word Art. But even if you don’t, choose a font that suits your layout, change the size, colour, emphasis, even rotate it, fade it, add a shadow or border. Make it your own. You can write out a title, the whole journalling section, or write a phrase/poem/’gobble-de-gook’ around a whole sheet as an individual backing paper. Then add it to your digital layout/page, or print it out on your chosen paper type and stick it on. If you need to add to your fonts, try: Dafont, 1001 free fonts, or one of my favourites, Iconian Fonts.

Use Your Software as A Mini-Photo Editor. Import your photo, and drop a text box on it to add your journalling or title right onto it. Add a border to the photo. Increase the photo to page size, and reduce transparency to make your own background. Rotate the photo. Layer photos on photos. Use multiple photos on one page to make a grid-syle layout. Adjust the image, depending on the options available. I find I use my Pages programme, more than I use my photo editing software.

Create Your Own Matt and Layering Shapes. Many programmes contain shapes which you can resize, and re-colour. Or remove any colour to give an out-line, then print it out onto your chosen papers or card, ready for you to cut out and use. You can even add photos, then recreate all your matting and layering together. Or make your own journalling box, complete with your writing. 


Using Templates and Clip-art: Most word processing programmes have a selection of templates or clip-art/copyright-free photos available for use. Spend some time looking at your templates and pictures. Do they give you inspiration for a scrapbooking layout? Can you use them as a basis for your pages and diaries? To give you some idea of how you can work with them, take a glance at my blog header. This is made up of pieces from a number of templates in iWorks Pages.


Project of the Day: Open up your word processing software now, choose a template you’ve never used, and see how you can incorporate it into your layout, or diary page.

I hope this has you looking at your software with different eyes. I’m sure that you will be able to come up with other ideas too. If you have any hints or tips you would like to share, please add them to the comments.

Happy Scribing!


Tuesday, 13 October 2009

The Crafty Scribe Communique - Smythson Diaries

Communiqué - News Flash - Communiqué 

Dear Scribblers

It’s that time again, when you begin to think about Christmas (or the Winter festival you celebrate) and of course, New Year.

2010 - A brand new decade!

Why not treat yourself to a new diary? In my opinion, the top purveyor of fine leather diaries is: Smythson of Bond Street


I have been lucky enough to own their exquisite notebooks, stationery items and of course, for a couple of years, their diaries. There are many sizes, page formats and colours available. Even diaries for specialist subjects such as; travel, art and sports, or organiser pages for the methodical amongst you.

My favourite diaries are the Bijou Soho, Bijou Portobello and Fashion varieties - they all contain sizeable notes sections which are perfect for the out-and-about scribbler. I also love the personalisation - there’s nothing like a bound leather diary with your name on.

Try the Smythson Diary Selector which will match you to your perfect diary.

For further information, check them out! Their diaries range from £25 to £250+, but the quality is outstanding. Once you have a Smythson diary, you'll never want anything else.  I know that the red Bijou Soho diary with slide closure will, once again, be on the top of my Santa’s wish list this year.


Happy Scribing!

Communique Ends - Communique Ends

Coming Soon - Part Three of Harnessing Your Alternative Computer Programmes for use in Journalling and Scrapbooking - Using Your Regular Word Processing Software in New Ways.

Search This Blog